2014년 2월 10일 월요일

How to use Pepbu:w
How to use Pepbu:w
1. Fraxel/
IPL/Toning + Pepbu:w
After Fraxel, IPL
or Nd yag
laser
apply 2.5m of Pepbu:w and
penetrate it with Cryo-Electroporation.
It reduce
febrile reaction and PIH risk and accelerate
skin regeneration
2. Mesotherapy
+ Pepbu:w
Make
micro holes on the skin with Auto stamp
needle(Tri-M) and apply Pepbu:w
3. Whintening
&
Lifting
 Apply
Pepbu:w and
absorb it with Cryo-electroporation
Apply
Pepbu:w and
absorb it with Cryo-electroporation
4. Alopeica Treatment
Stimulate Scalp with MTS and apply Pepbu:w
* Precautions *
1.
Store it in the Refrigerator (Expiry date
:2 years)
2.
Once you open the cap, please use it within 1 week.
3.
Do not use it, if you observe red spots on your face.
4. Do
not use it for sensitive skin and acne skin.
2014년 2월 6일 목요일
How to use D-Cam
How to use D-cam (Skin Diagnosis)
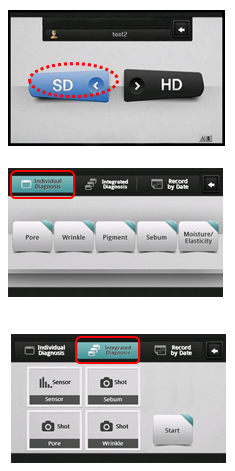
<Skin> Diagnosis
Diagnose
every part of pore, wrinkle, pigment,
sebum, moisture / elasticity step by step.
◈ Individual Diagnosis ◈

 you can see the measured value of the part.
◈ <Pore> Diagnosis result ◈
 *** Once you have finished diagnosis for Moisture / Elasticity / Pore / Wrinkle / Sebum / Pigmentation, you can see the overall result ***
◈ Result page ◈
How to use D-cam (Hair Diagnosis)

◈ HD Diagnosis ◈

◈ Individual Diagnosis ◈


◈ Result page ◈
Here's a brief example of how to use D-cam
<SD>
BUTTON
Moisture
/ Elasticity / Pore
/
Wrinkle / Sebum / Pigmentation
Click
‘SD’ to start skin diagnosis.
◈ Individual Diagnosis ◈
Select
certain test among pore, wrinkle, pigment, sebum, moisture / elasticity and
diagnose separately.
◈ Integrated Diagnosis ◈
◈ Individual Diagnosis ◈
Click
‘Individual Diagnosis’
<Pore> diagnosis
1) Click ‘Pore’ to measure pore condition.
2) put camera on the skin and click ‘shot’
** Click <Shot> to re-take a photo.
The
test value will be shown automatically
at
the bottom of left.
Manual
measurement
** Click pore part colored with green.
you can see the measured value of the part. ◈ <Pore> Diagnosis result ◈
3) Click ‘Result’ button.
<Do you want to save the test
result?>
4) Select ‘Yes’ or ‘No’
5) Move to result page.
*** Once you have finished diagnosis for Moisture / Elasticity / Pore / Wrinkle / Sebum / Pigmentation, you can see the overall result ***◈ Result page ◈
Result 1
-Skin age(Optional)
-Result graph
- intensive skincare zone,
**
Touch the screen with a finger and drag
upward
to move to the next page
Drag
downward to Move back to the preceding page.
Result 2 :
- Skin type and description
Result 3
-Compare the customer’s skin with
standard (ideal) skin image.
-
Skin status simulation
Current status: current skin condition.
Without treatment: If the skin is left
untreated,
the skin condition may worsen than its
current
state.How to use D-cam (Hair Diagnosis)
◈ HD Diagnosis ◈
Diagnose Scalp Type / Hair Density / Sebum / Hair Loss /
Hair Damage / Hair Thickness
Put the camera on your scalp and
take a photo
to measure.
◈ Individual Diagnosis ◈
Select certain test item and
diagnose separately.
1) Click ‘Scalp type’ to diagnose
scalp type.
2) Put camera on scalp and take a
photo by clicking ‘shot’.
** ** Click <Shot> to re-take
a photo.
3) Click ‘compare’ and select
similar sample.
4) Click ‘OK’ and ‘Result’ to go to
result page.
◈ <Sebum> Diagnosis ◈
1) Click ‘Sebum,’ to diagnose
Sebum.
2) Put camera on scalp and take a
photo
by clicking ‘shot’.
** Click <Shot> to re-take a
photo.
the test value will be shown
automatically
at the bottom of left.
3) Click ‘Result’ to go to result
page.
◈ Integrated Diagnosis ◈
1) Select the most similar type of
when you see
the scalp at top position.
2) Click ‘Next’.
3) Put camera on hair and take
a
photo by clicking ‘shot’.
** ** Click <Shot> to re-take
a photo.
4) Click ‘compare’ and select
similar sample.
5) Click ‘OK’ and ‘Next’.
• Hair Thickness uses the image of
Hair Damage.
1) If you want to re-take a photo, Put camera on scalp and take a
photo by clicking ‘shot’.
2) Drag a hair and check thickness.
3) Click ‘Result’.
<Do you want to save the test
result?>
4) Select ‘Yes’ or ‘No’Move to result page.
*** Once you have finished diagnosis for Scalp Type / Hair Density / Sebum / Hair Loss /Hair Damage / Hair Thickness you can see the overall result ***
◈ Result page ◈
Result 1
- Result graph
- intensive skincare zone,
Result 2 :
- Result of each test
Result 3,4,5,6,7,8,9
- Specific description of each result
D-Cam
D-Cam (Skin
Analyzer)


Main Function
-
Accurate Diagnosis skin / Automatic
Skin and Hair Analysis
-
Automatic Recommendation of Product and Service
Strength
Handy
size : Same as a camera size compared to the existing
skin analyzer
Wi-Fi
function
:
Available
to transfer the image and data to computer through Wi-Fi
Easy
to use :
(Touch screen)
Very easy to operate program with finger
Mobile
solution
:
Very compact and light embedded computer system
Embedded
Sensor : Equipped
with “Moisture” and “Elasticity” sensor inside the body
Integrated
with “Skin” &
“Hair” Diagnosis
:
Built
in skin and hair diagnosis system
Easy
to back-up data :
Data back-up is possible with USB or mini-SD card


피드 구독하기:
글 (Atom)